Battery switch on travel trailer function is crucial for managing your RV’s power. This guide will walk you through understanding its purpose, different types, wiring, operation, and troubleshooting. We’ll cover everything from preventing parasitic battery drain to integrating with solar power, ensuring you’re well-equipped to handle your travel trailer’s electrical system confidently.
Properly using your battery switch is essential for extending the life of your batteries and preventing electrical issues on the road. We’ll explore the various configurations, helping you understand how to safely switch between your house and vehicle batteries, maximizing your power and minimizing downtime. We’ll also delve into safety precautions and best practices to keep you and your RV safe.
Understanding Battery Switch Functionality in Travel Trailers
A battery switch is a crucial component in a travel trailer’s electrical system, allowing you to manage the power flow between your trailer’s batteries and your various appliances and systems. Understanding how it works is essential for safe and efficient operation of your RV.
The primary purpose of a battery switch is to isolate and control the power coming from your trailer batteries. This allows you to selectively use either your house battery (typically used for interior lights, appliances, etc.), your starting battery (for your tow vehicle’s engine), or both simultaneously. It also provides a crucial “off” position to prevent accidental drain on your batteries when the trailer is not in use, thus extending their lifespan.
Battery Switch Types
Several types of battery switches exist, each offering a different level of control. The most common are the 1-2-Both-Off and 1-2-Off switches. A 1-2-Both-Off switch allows you to select power from battery 1, battery 2, both batteries, or to completely disconnect both. A 1-2-Off switch offers the option to select power from either battery 1 or battery 2, or to turn both off.
The choice depends on your specific needs and the configuration of your trailer’s electrical system. Some higher-end trailers even incorporate more sophisticated electronic switches offering remote control and monitoring capabilities.
Typical Wiring Configuration
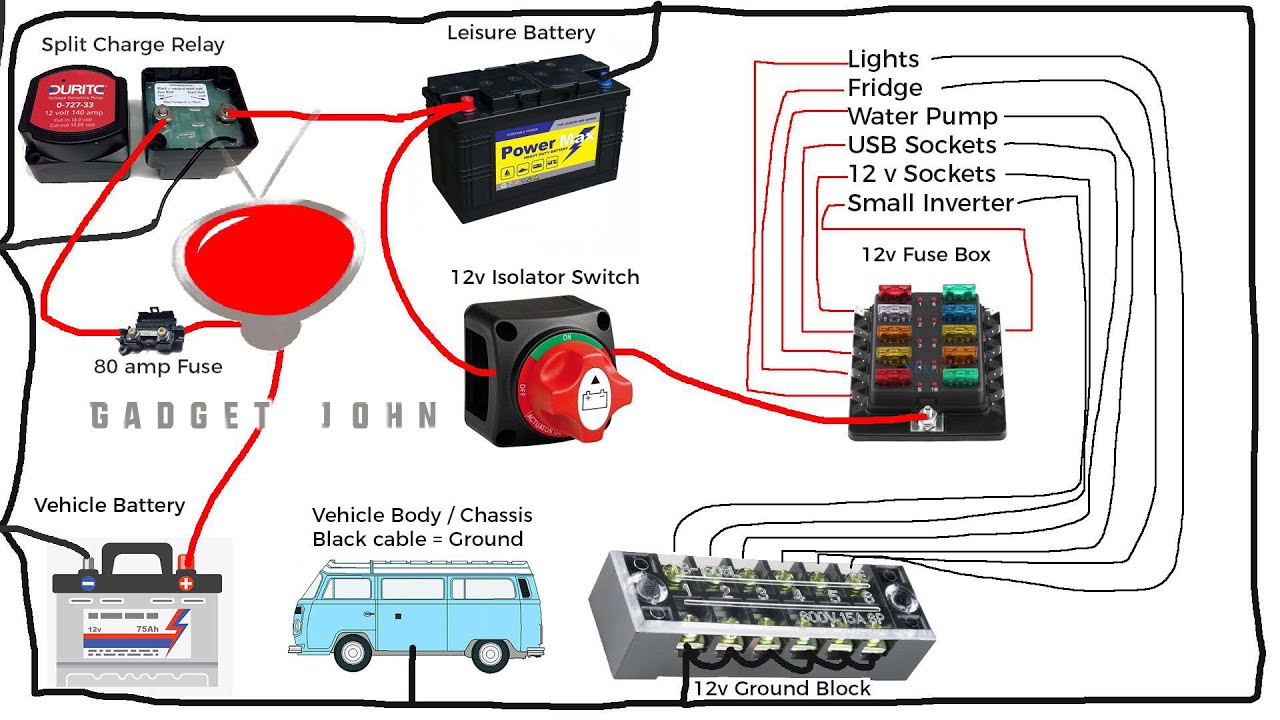
Typically, a battery switch is wired directly to the positive (+) terminals of your trailer’s batteries. The negative (-) terminals are usually connected directly to the chassis of the trailer (ground). From the battery switch, positive power is routed to the various circuits within your trailer, including the distribution panel. This configuration ensures that all power flows through the switch, allowing for complete control over battery usage.
A properly wired system will also include appropriate fuses and circuit breakers to protect against overloads and short circuits. For instance, a typical setup might involve a main positive cable from the switch to the distribution panel, with smaller cables branching off to feed individual circuits.
Operating a Battery Switch
Operating your battery switch is straightforward but requires attention to detail. Before operating the switch, ensure that you understand the position of each setting. Typically, the positions are clearly labeled (1, 2, Both, Off).
- Off Position: This completely disconnects both batteries from the trailer’s electrical system, preventing any drain. Use this position when storing your trailer for extended periods.
- Battery 1 (or House Battery): Selecting this position allows only the house battery to power the trailer’s appliances and lights.
- Battery 2 (or Starting Battery): This position powers only the starting battery (typically used for the tow vehicle’s engine). Note: Using this position to power trailer components is usually not recommended.
- Both: Selecting “Both” allows both batteries to power the trailer, providing increased capacity for longer periods of off-grid use.
Always double-check the switch position before and after use to ensure you have the desired configuration. Improper use can lead to discharged batteries or damage to your electrical system.
Battery Switch and Power Management

Your travel trailer’s battery switch is the central control for managing power flow between your house batteries (powering your trailer’s interior systems) and your vehicle’s battery (used for starting your tow vehicle). Understanding how it works is key to preventing problems and ensuring you have power when you need it.The battery switch’s primary function is to isolate your house batteries from the vehicle battery and from each other.
So, you’re planning a trip? Awesome! First things first: get yourself sorted with travel insurance. Check out Aon travel insurance for some solid options; you’ll want to be covered for anything unexpected. Then, if you’re an audiophile like me, don’t forget your tunes! Planning your audiophile travel setup beforehand is key for enjoying those amazing landscapes with your favorite music.
Get that sorted and you’re practically ready to go!
This isolation is crucial to prevent parasitic drain, a situation where your house batteries slowly discharge even when your trailer isn’t in use, due to a small constant draw from things like clocks or low-level electronics. This drain can leave you with a dead battery when you’re ready to head home.
Battery Switch Operation and Power Flow
The typical battery switch has three or more positions. One position connects the house batteries to the vehicle battery, allowing charging of the house batteries from the vehicle’s alternator while driving. Another position isolates both batteries completely, preventing any power flow between them, ideal for long-term storage. A third position usually connects only the house batteries to the trailer’s electrical system, allowing you to use your trailer’s power while the vehicle is disconnected.
Interaction with Other Electrical Components
The battery switch acts as a gatekeeper for power. It works in conjunction with other components like the converter (which converts 12V DC from your batteries to 120V AC for your household appliances) and the inverter (which converts 12V DC to 120V AC for higher power needs). When the switch is in the “on” position connecting the house batteries to the trailer’s system, power flows from the batteries to the converter and inverter, enabling the operation of your appliances and electronics.
When the switch is off, these components are deactivated, preventing battery drain.
Diagram of Power Flow
Imagine a simple diagram: Three circles represent the vehicle battery, the house batteries, and the trailer’s electrical system (including the converter and inverter). Three lines represent the connections.* Position 1 (All Connected): A line connects the vehicle battery to the house batteries, and another line connects the house batteries to the trailer’s electrical system. Power flows from the vehicle battery to charge the house batteries and then to the trailer’s systems.* Position 2 (House Batteries Only): Only a line connects the house batteries to the trailer’s electrical system.
Power flows only from the house batteries to the trailer’s systems.* Position 3 (Off): All lines are disconnected. No power flows between the vehicle battery, house batteries, and the trailer’s electrical system. This completely isolates the batteries.
Troubleshooting Common Battery Switch Issues
Your travel trailer’s battery switch is a crucial component, ensuring you can seamlessly switch between shore power, your onboard batteries, and various combinations. Problems with this switch can leave you stranded without power, so understanding common issues and troubleshooting techniques is vital. This section details how to identify, diagnose, and fix common battery switch problems.
Common Battery Switch Problems and Their Causes
Several factors can lead to a malfunctioning battery switch. These problems often stem from simple issues easily resolved with basic maintenance, but ignoring them can lead to more significant problems. Understanding the root cause is the first step to effective troubleshooting.
| Problem | Cause | Symptom | Solution |
|---|---|---|---|
| Corrosion on terminals | Exposure to moisture and elements | Poor connection, sparking, reduced power | Clean terminals with a wire brush, baking soda paste, and water. Apply dielectric grease after cleaning. |
| Loose connections | Vibration, improper installation | Intermittent power, flickering lights | Tighten all connections securely. Ensure all wires are properly seated in their terminals. |
| Switch failure | Wear and tear, overheating | No power to appliances, switch unresponsive | Replace the battery switch. Consider upgrading to a higher-quality switch. |
| Wiring problems | Damaged or frayed wires | Partial power, short circuits | Inspect all wiring for damage. Repair or replace damaged wires. |
| Incorrect switch position | User error | No power to appliances, despite battery being charged | Verify the switch is in the correct position for the desired power source. |
Diagnosing a Malfunctioning Battery Switch
Before replacing parts, systematically diagnose the problem. Start with a visual inspection for obvious issues like corrosion or loose connections. A multimeter is your best friend here; it allows for precise testing of voltage and continuity.
Testing the Battery Switch and Wiring
To test the switch itself, disconnect the wiring from the switch. Use a multimeter set to the continuity test setting to check for a closed circuit when the switch is in the “on” position for each battery and power source. An open circuit indicates a faulty switch. To test the wiring, check for continuity between the switch terminals and the battery terminals, and the power source terminals (shore power connection) when the switch is in the correct position.
A lack of continuity indicates a break in the wiring.
Replacing a Faulty Battery Switch
Replacing a battery switch is usually straightforward. Disconnect the power to the switch and carefully remove the existing switch. Take note of the wiring configuration before disconnecting it. Install the new switch, ensuring the wiring is correctly connected according to the wiring diagram, and re-connect the power. Always consult your travel trailer’s wiring diagram to ensure proper installation.
After installation, thoroughly test the system to confirm that everything is working correctly.
Planning a trip? Awesome! First things first: get yourself sorted with travel insurance. Check out Aon travel insurance for comprehensive coverage. Then, if you’re an audiophile like me, you’ll want to check out audiophile travel setup guides to ensure your tunes sound amazing on the go. These two things will make your travels way more enjoyable and stress-free!
Safety Precautions and Best Practices: Battery Switch On Travel Trailer Function
Working with your travel trailer’s electrical system, including the battery switch, requires caution. Improper handling can lead to serious injury from electric shock or even fire. Always prioritize safety when performing any maintenance or troubleshooting.Proper procedures ensure the longevity and reliable operation of your battery switch and associated components. Neglecting these procedures can lead to premature failure, costly repairs, and potential safety hazards.
Disconnecting the Battery Before Working on Electrical Components
Before undertaking any work on the electrical system of your travel trailer, including the battery switch, it’s crucial to disconnect the battery. This prevents accidental shocks and short circuits. Use insulated tools to avoid contact with metal parts and always disconnect the negative (-) terminal first, then the positive (+) terminal. This minimizes the risk of accidental sparks that could ignite flammable materials.
After completing your work, reconnect the positive terminal first, followed by the negative.
Best Practices for Maintaining the Battery Switch and Preventing Future Issues
Regular maintenance is key to ensuring your battery switch operates reliably. This includes periodic inspection and cleaning. A simple visual inspection can reveal loose connections, corrosion, or damage. Addressing these issues promptly can prevent more serious problems down the line.
- Inspect the battery switch and connections for corrosion at least twice a year, or more frequently in harsh environments.
- Tighten any loose connections. Use the correct size wrench to avoid damaging the terminals.
- Apply a corrosion inhibitor to the terminals and connections to prevent future corrosion. Many automotive stores sell products specifically designed for this purpose.
- Regularly check the switch’s operation to ensure it’s functioning correctly. Switching between positions should be smooth and free of resistance.
- Consider using a battery disconnect switch with a cover to protect it from the elements and accidental contact.
Cleaning and Inspecting the Battery Switch and Connections, Battery switch on travel trailer function
Cleaning the battery switch and connections involves removing corrosion and debris. Use a wire brush or sandpaper to clean the terminals, removing any white or green corrosion build-up. Be sure to clean both the terminals and the switch itself. After cleaning, apply a dielectric grease to protect the connections from moisture and corrosion. This simple step can significantly extend the life of your battery switch and prevent future issues.
Remember to always wear appropriate safety glasses and gloves when performing this task. A baking soda and water paste can also be used to neutralize acid build-up, followed by a thorough rinsing and drying.
Battery Switch Integration with Solar and Other Power Sources
Your travel trailer’s battery switch plays a crucial role in managing power from various sources, not just your onboard batteries. Understanding how it interacts with solar panels and other alternative power sources is key to maximizing your off-grid capabilities and preventing potential issues. This section will explore the interplay between your battery switch and various power systems, focusing on charging, discharging, and overall system performance.Integrating solar panels, generators, or shore power with your battery switch requires careful consideration of how these sources interact with your batteries and the switch’s configuration.
The switch itself doesn’t directly control the charging process from these sources; instead, it manages the flow of powerfrom* the batteries to your trailer’s appliances. The charging process is handled by separate charge controllers (for solar) and converters (for shore power and generators).
Solar Panel Integration
Solar panels, connected through a charge controller, provide a clean and renewable energy source for charging your trailer batteries. The battery switch’s role is to disconnect the batteries from the rest of the trailer’s electrical system when not in use, preventing unwanted drain. With the switch in the “on” position, the charge controller will supply power to the batteries, even when no other power source is connected.
The charge controller regulates the voltage and current, protecting your batteries from overcharging. A properly sized solar panel system, combined with an efficient charge controller, can significantly extend your off-grid time. If your system has a battery disconnect switch, you should always turn it to the “off” position when not using the RV for extended periods to prevent battery drain.
Generator and Shore Power Integration
Generators and shore power (hooking up to a campsite’s electrical supply) typically use a converter to regulate the incoming AC power and convert it to DC power for charging your batteries. Again, the battery switch doesn’t control the charging process, but it determines whether the charged batteries can power your trailer’s appliances. With the switch “on,” the converter charges the batteries, and the batteries supply power to your appliances.
With the switch “off,” the batteries are isolated, preventing drain, but also preventing the use of appliances.
Comparison of Battery Switch Configurations
Different battery switch configurations can impact how effectively you manage power from multiple sources. A simple single-battery switch offers basic on/off control. More advanced systems, like those with multiple banks or automatic switching, allow for greater control and flexibility, especially when dealing with multiple power sources and battery types. For example, a system with two battery banks (one for starting, one for house power) and a multi-position switch allows for separate management of each bank, maximizing usage and extending the life of each battery.
A more complex system might incorporate a smart battery management system, automatically optimizing charging and discharging from all power sources.
Advantages and Disadvantages of Integrated Systems
The integration of your battery switch with various power systems presents both benefits and drawbacks.
Here’s a summary:
- Advantage: Enhanced power management – Allows for efficient use of multiple power sources, optimizing battery life and extending off-grid capabilities.
- Advantage: Improved safety – Isolates batteries when not in use, preventing accidental discharge and potential damage.
- Advantage: Increased flexibility – Provides more control over power distribution, allowing for customized usage scenarios.
- Disadvantage: Increased complexity – More sophisticated systems can be more difficult to understand and maintain.
- Disadvantage: Higher initial cost – Advanced battery switches and associated components can be more expensive than simpler systems.
- Disadvantage: Potential for compatibility issues – Ensuring compatibility between different components (solar controller, converter, battery switch) requires careful planning.
Mastering your travel trailer’s battery switch empowers you to confidently manage your RV’s power, ensuring smooth and enjoyable trips. By understanding the function, troubleshooting common issues, and implementing best practices, you’ll be prepared for any electrical situation. Remember, safety is paramount – always disconnect batteries before working on electrical components. Happy travels!
User Queries
What happens if my battery switch is faulty?
A faulty switch can lead to dead batteries, electrical malfunctions, and potentially damage to other components. You might experience inconsistent power, or complete power loss.
How often should I clean my battery switch and connections?
Inspect and clean your battery switch and connections at least once a year, or more frequently if you notice corrosion or other issues. A simple wire brush and baking soda solution can work wonders.
Can I use a battery switch with lithium batteries?
While some battery switches are compatible with lithium batteries, it’s crucial to check the manufacturer’s specifications for both the switch and the batteries. Lithium batteries have specific charging requirements that need to be considered.
How do I determine which battery is my house battery and which is my vehicle battery?
Consult your RV’s wiring diagram or owner’s manual. Often, the house battery is larger and dedicated to powering the RV’s interior systems, while the vehicle battery powers the starting system.
